Using IFTTT to Automatically Post from Twitter to Misskey
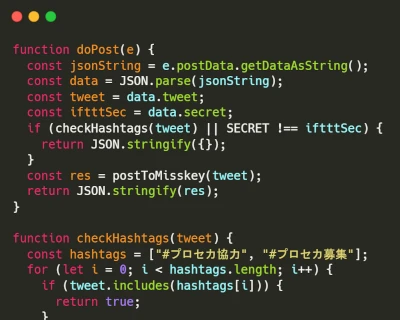
Table of Contents
I started using Misskey after the Twitter API restrictions incident. Although Misskey is personally developed and operated, it has a more approachable atmosphere than Threads, and I’ve come to appreciate it as a fun platform for programming-related activities. However, since no one around me has switched to Misskey, I’m mostly posting notes alone, which can feel a bit lonely. To address this, I decided to loosely post on Twitter while also mirroring relevant Tweet content as notes on Misskey for parallel use. To avoid indiscriminately auto-posting, which could result in contextless notes on Misskey, I’ll implement measures to filter content. While copy-pasting is an option, this article includes JavaScript-based programming.
Preparation
- IFTTT Pro+ (a paid plan)
- Google account
- X (Twitter) account
- Account on any server running Misskey
Procedure
The overall process involves publishing an API using Google Apps Script to automatically post to Misskey. When a Tweet is posted from your owned Twitter account, IFTTT will send the Tweet via Webhook to that API, which then forwards the data to the Misskey API. Once the server receives the data, the Tweet content will be posted as a note on your Misskey account. I’ll detail the steps one by one below.
Writing the API Processing in Google Apps Script
First, here’s a simple outline of the steps:
- Access the Google Apps Script homepage
- Click “New project”
- Change “Untitled project” to a recognizable name like “twitterToMisskey”
- Rename “Code.gs” to something like “main.gs”
- From the left menu, click the + button under Files and select “Script”
- A new script will be generated; type “local” and press Enter
- Follow the code below to write your script
In main.gs, you’ll write code to receive posts from IFTTT (like Twitter posts) and create a note on Misskey with the Tweet content.
function doPost(e) {
  const jsonString = e.postData.getDataAsString();
  const data = JSON.parse(jsonString);
  const tweet = data.tweet;
  const iftttSec = data.secret;
  if (checkHashtags(tweet) || SECRET !== iftttSec) {
    return JSON.stringify({});
  }
  const res = postToMisskey(tweet);
  return JSON.stringify(res);
}

function checkHashtags(tweet) {
  // This checks if the tweet contains any words from the hashtags array and skips posting to Misskey if it does
  const hashtags = ["#プロセカ協力", "#プロセカ募集"];
  for (let i = 0; i < hashtags.length; i++) {
    if (tweet.includes(hashtags[i])) {
      return true;
    }
  }
  return false;
}

function postToMisskey(noteText) {
  // For non-official servers, replace the host name with your server's host
  const host = "misskey.io";
  const ENDPOINT = `https://${host}/api/notes/create`;
  let options = {
    method: "post",
    contentType: "application/json",
    payload: JSON.stringify({
      localOnly: false,
      noExtractMentions: false,
      noExtractHashtags: false,
      noExtractEmojis: false,
      text: noteText,
      i: MISSKEY_TOKEN
    })
  };
  let response = UrlFetchApp.fetch(ENDPOINT, options);
  return response.getContentText();
}
Next, obtain the token for accessing the Misskey API. Access Misskey, go to Settings > API, and click “Issue access token.” Then, enable the permission for “Create and delete notes” and click the checkmark in the top right. Copy the displayed token and return to Google Apps Script.
Paste the copied token into local.gs:
const MISSKEY_TOKEN = "Paste the copied token here";
const SECRET = "An arbitrary string"; // Use the same string in IFTTT as a password substitute
Deploying the API
Click “Deploy” in the top right and select “New deployment.”
- Choose “Web app” for the type
- Enter a descriptive explanation like “iftttToMisskey”
- Set “Execute as” to “Me”
- Set “Who has access” to “Anyone”
- Click “Deploy”
Once deployment is complete, click the copy icon next to the web app URL. You’ll use this URL in IFTTT.
IFTTT Settings
In IFTTT, set it up so that when you post a Tweet from your owned account, it sends the data to the deployed API.
Setting Up Detection
- Access IFTTT and click “Add”
- Search for “Twitter” in Search Service
- Select Twitter from the results
- Click “New tweet by you”
- Fill in the form:
- Select your Twitter account under Twitter account (log in and authenticate if not connected)
- Leave “Include” unchecked (this prevents Retweets and replies from being posted to Misskey)
- Click “Create trigger”
Sending Data to the API
- Click “Add” under Then That
- Search for “Webhooks” in Search Service
- Select Webhooks from the results
- Click “Make a web request”
- Paste the URL you copied from Google Apps Script into the URL field
- Change Method to POST
- Set Content Type to application/json
- Set Body to ”{‘tweet’: ‘{{text}}’, ‘secret’: ‘Paste the SECRET value from local.gs here’}”
- Click “Create action”
Saving the Recipe
- Click “Continue”
- Enter a descriptive title for Applet Title, like “When @rmc_km makes a new tweet, note it to @rmc8@misskey.io”
- Click “Finish”
Summary
Once you’ve completed these steps, the setup is done. Now, post a Tweet from your configured Twitter account and check if the content appears as a note on your Misskey account. This article explains how to use IFTTT and Google Apps Script to automatically post to Misskey. With IFTTT Pro, you can reuse settings for multiple Twitter accounts and post to Misskey, even if users haven’t migrated there yet. Even if your followers on Twitter don’t switch, this allows for easy parallel operation and might create opportunities for new interactions on the migration platform. However, since it’s automated, be mindful of filtering unnecessary posts and preventing Retweets or replies from being shared. By using it effectively, you can stay engaged with Twitter while creating a smooth transition environment. We hope you find this useful.


Loading comments...