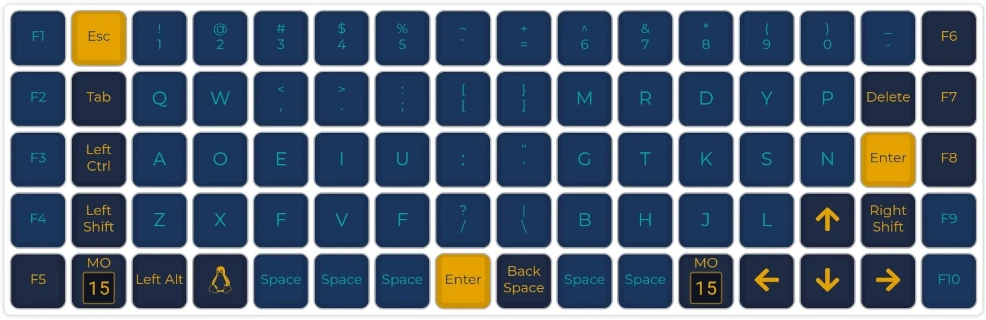
[Custom Keyboard] Assembling and Using Choco60
I was using the English version of HHKB for programming purposes, but I decided to build a custom keyboard to achieve even better usability and reduce physical strain. I was drawn to Choco60 because its layout is similar to the English version of HHKB, making it compact and easy to handle shortcuts.
Reasons for Choosing Choco60 and Custom Keyboards
As mentioned at the beginning, I was interested in its layout, which is almost identical to the English version of HHKB, offering a compact design that makes shortcuts easy to use. Additionally, since the keyboard is split in the center, it allows for open shoulders and a more natural typing posture. Using a keyboard often leads to hunched shoulders and poor posture, but splitting the keyboard can help prevent this, reducing issues like shoulder stiffness and back tension.
In February, I was involved in a traffic accident and have been attending a chiropractic clinic, but due to my job requiring extensive keyboard use, it's possible that my hunched posture is contributing to my discomfort. This is why I chose a split keyboard. Moreover, with the recent situation leading to prolonged WFH (work from home), my keyboard usage has increased, so I wanted a keyboard with my preferred key feel. I've been using electrostatic keyboards like Realforce and HHKB for about 10 years, but I prefer the feel of mechanical switches, specifically something like Cherry's black switches. To explore heavier switches, I decided to build a custom keyboard.
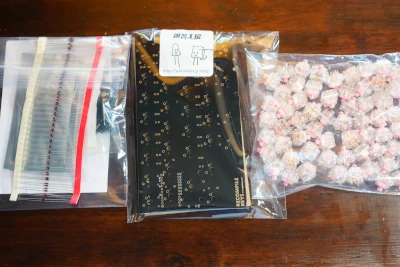
Materials
Materials | Unit Price | Quantity | Total Amount | Purchase Source |
|---|---|---|---|---|
¥15,400 | 1 | ¥15,400 | Yushakobo | |
¥708 | 13 | ¥9,204 | Yushakobo | |
¥110 | 26 | ¥2,860 | TALP KEYBOARD | |
¥110 | 4 | ¥440 | TALP KEYBOARD | |
¥150 | 2 | ¥300 | TALP KEYBOARD | |
¥150 | 3 | ¥450 | TALP KEYBOARD | |
¥150 | 1 | ¥150 | TALP KEYBOARD | |
3.5mm 4-pole Plug (TRRS) | ¥80 | 2 | ¥160 | ALI Express |
PET Tube (Carbon) | ¥150 | 1 | ¥150 | Oyaide Electric |
Paracord (30m) | ¥1000 | 1 | ¥1,000 | ALI Express |
PTFE Cable (1m) | ¥120 | 2 | ¥240 | Akihabara |
Assembly
Build Guideを参考に組み立てます。はんだ付けは慣れているのですが部品を曲げてはんだ付けしたり、TRRSケーブルを作るところをやったりで、ファームウェアの焼き込みも含めて2時間ほどかかりました。
Using pliers, bend the diode legs and insert them into the PCB board for soldering. You could bend them by hand and insert them all at once to solder quickly, but due to my personality, I took my time here, which took the most time.
Attach the TRRS jack and reset button on the side opposite the diodes.
Install the stabilizers. Note that the stabilizer on the right shift key is oriented in the opposite direction, but that's correct.
Attach the acrylic board. I was worried about cracking it by overtightening the screws, so I used a torque driver for this step.
Firmly insert the switches into the acrylic board and solder them. Before soldering, double-check that everything is correctly assembled and securely fitted to the PCB board, as fixing mistakes later can be very troublesome.
I forgot to take a photo, but mount the Pro Micro to the PCB. It seems you just need to solder a special pin header to the Pro Micro side and plug it into the PCB. Be careful, as the soldering points on the Pro Micro might interfere with the acrylic board, so trim any protruding pins. I also applied a small amount of epoxy adhesive to reinforce the USB connector, but be cautious not to let it flow into the USB jack.
Cut the wires into 50cm lengths and make a 4-core TRRS cable. Paracord can be obtained cheaply from Amazon or AliExpress. Solder the wires to the TRRS plug, twist them appropriately, thread them through the paracord outer covering, and then pass them through the PET tube. Once you attach the other TRRS plug, you're done.
Connect the Choco60 units using the TRRS cable and connect to the PC. Follow the guide to flash the firmware, and it will be ready for use.
Completion
At first, I felt it was hard to type because I wasn't used to the split keyboard, but once I got accustomed to it, typing became smoother and I could type in a more natural posture. Subjectively, the Sakurios switches are very quiet, so I think they would be fine even in an office environment. At least, compared to HHKB, it's on a different level—the sound isn't light, but it has a calm, clacky feel.
Sakurios, which I thought was quiet subjectively, actually makes a subtle sound when recorded. pic.twitter.com/86jS1wiTGW
— K (@rmc_km) July 6, 2020
I'm not entirely sure if it supports N-key rollover, but for typical tasks like writing documents or programming, most people should have no issues.
I'm getting quite used to Choco60 + Sakurios!
High-end 10,000 yen course [Normal],
★14,840 yen saved! (Speed: 7.5 keys/sec, Errors: 26 keys)
https://t.co/DKwaVvDqXp #Sushi Hit pic.twitter.com/lb6CReNe9a— K (@rmc_km) July 6, 2020
Sakurios felt lighter than I expected personally, but after getting used to it, I don't feel fatigued even during long typing sessions, and it seems well-balanced. The linear switches provide a smooth, stress-free press, which is different from Realforce or HHKB, and I've become addicted to it. Personally, I prefer the feel of mechanical linear switches.
That said, Realforce and HHKB are attractive for their durability—they last 10 years without issues and maintain consistent performance—so for most people, I might recommend commercial products over custom ones. However, for those like me who aren't satisfied with that, custom keyboards offer powerful customization, allowing you to choose the keyboard, switches, and keycaps to optimize for your needs. It's not cheap, and it has some unique aspects compared to standard keyboards, but the appeal of creating a keyboard tailored to yourself is something you can't get from off-the-shelf products, making it a fun world for those who are particular about details.
Once WFH ends, I'd like to build another keyboard for home use.
Eucalyn Layout
With custom keyboards, you can even modify the key layout itself, and I discovered an interesting layout on Yushakobo. It's very typing-friendly for Japanese, and after verifying with 10,000 lines of Python code, it's an efficient layout. I was able to learn touch typing in 15 minutes to 2 hours and increase my speed to 3.4 keys/sec in 17 days, so I'd like to introduce the details next time.
[Link to Eucalyn Layout Discussion]


Loading comments...