[Rust] Blinking an LED with a Raspberry Pi Learning Kit
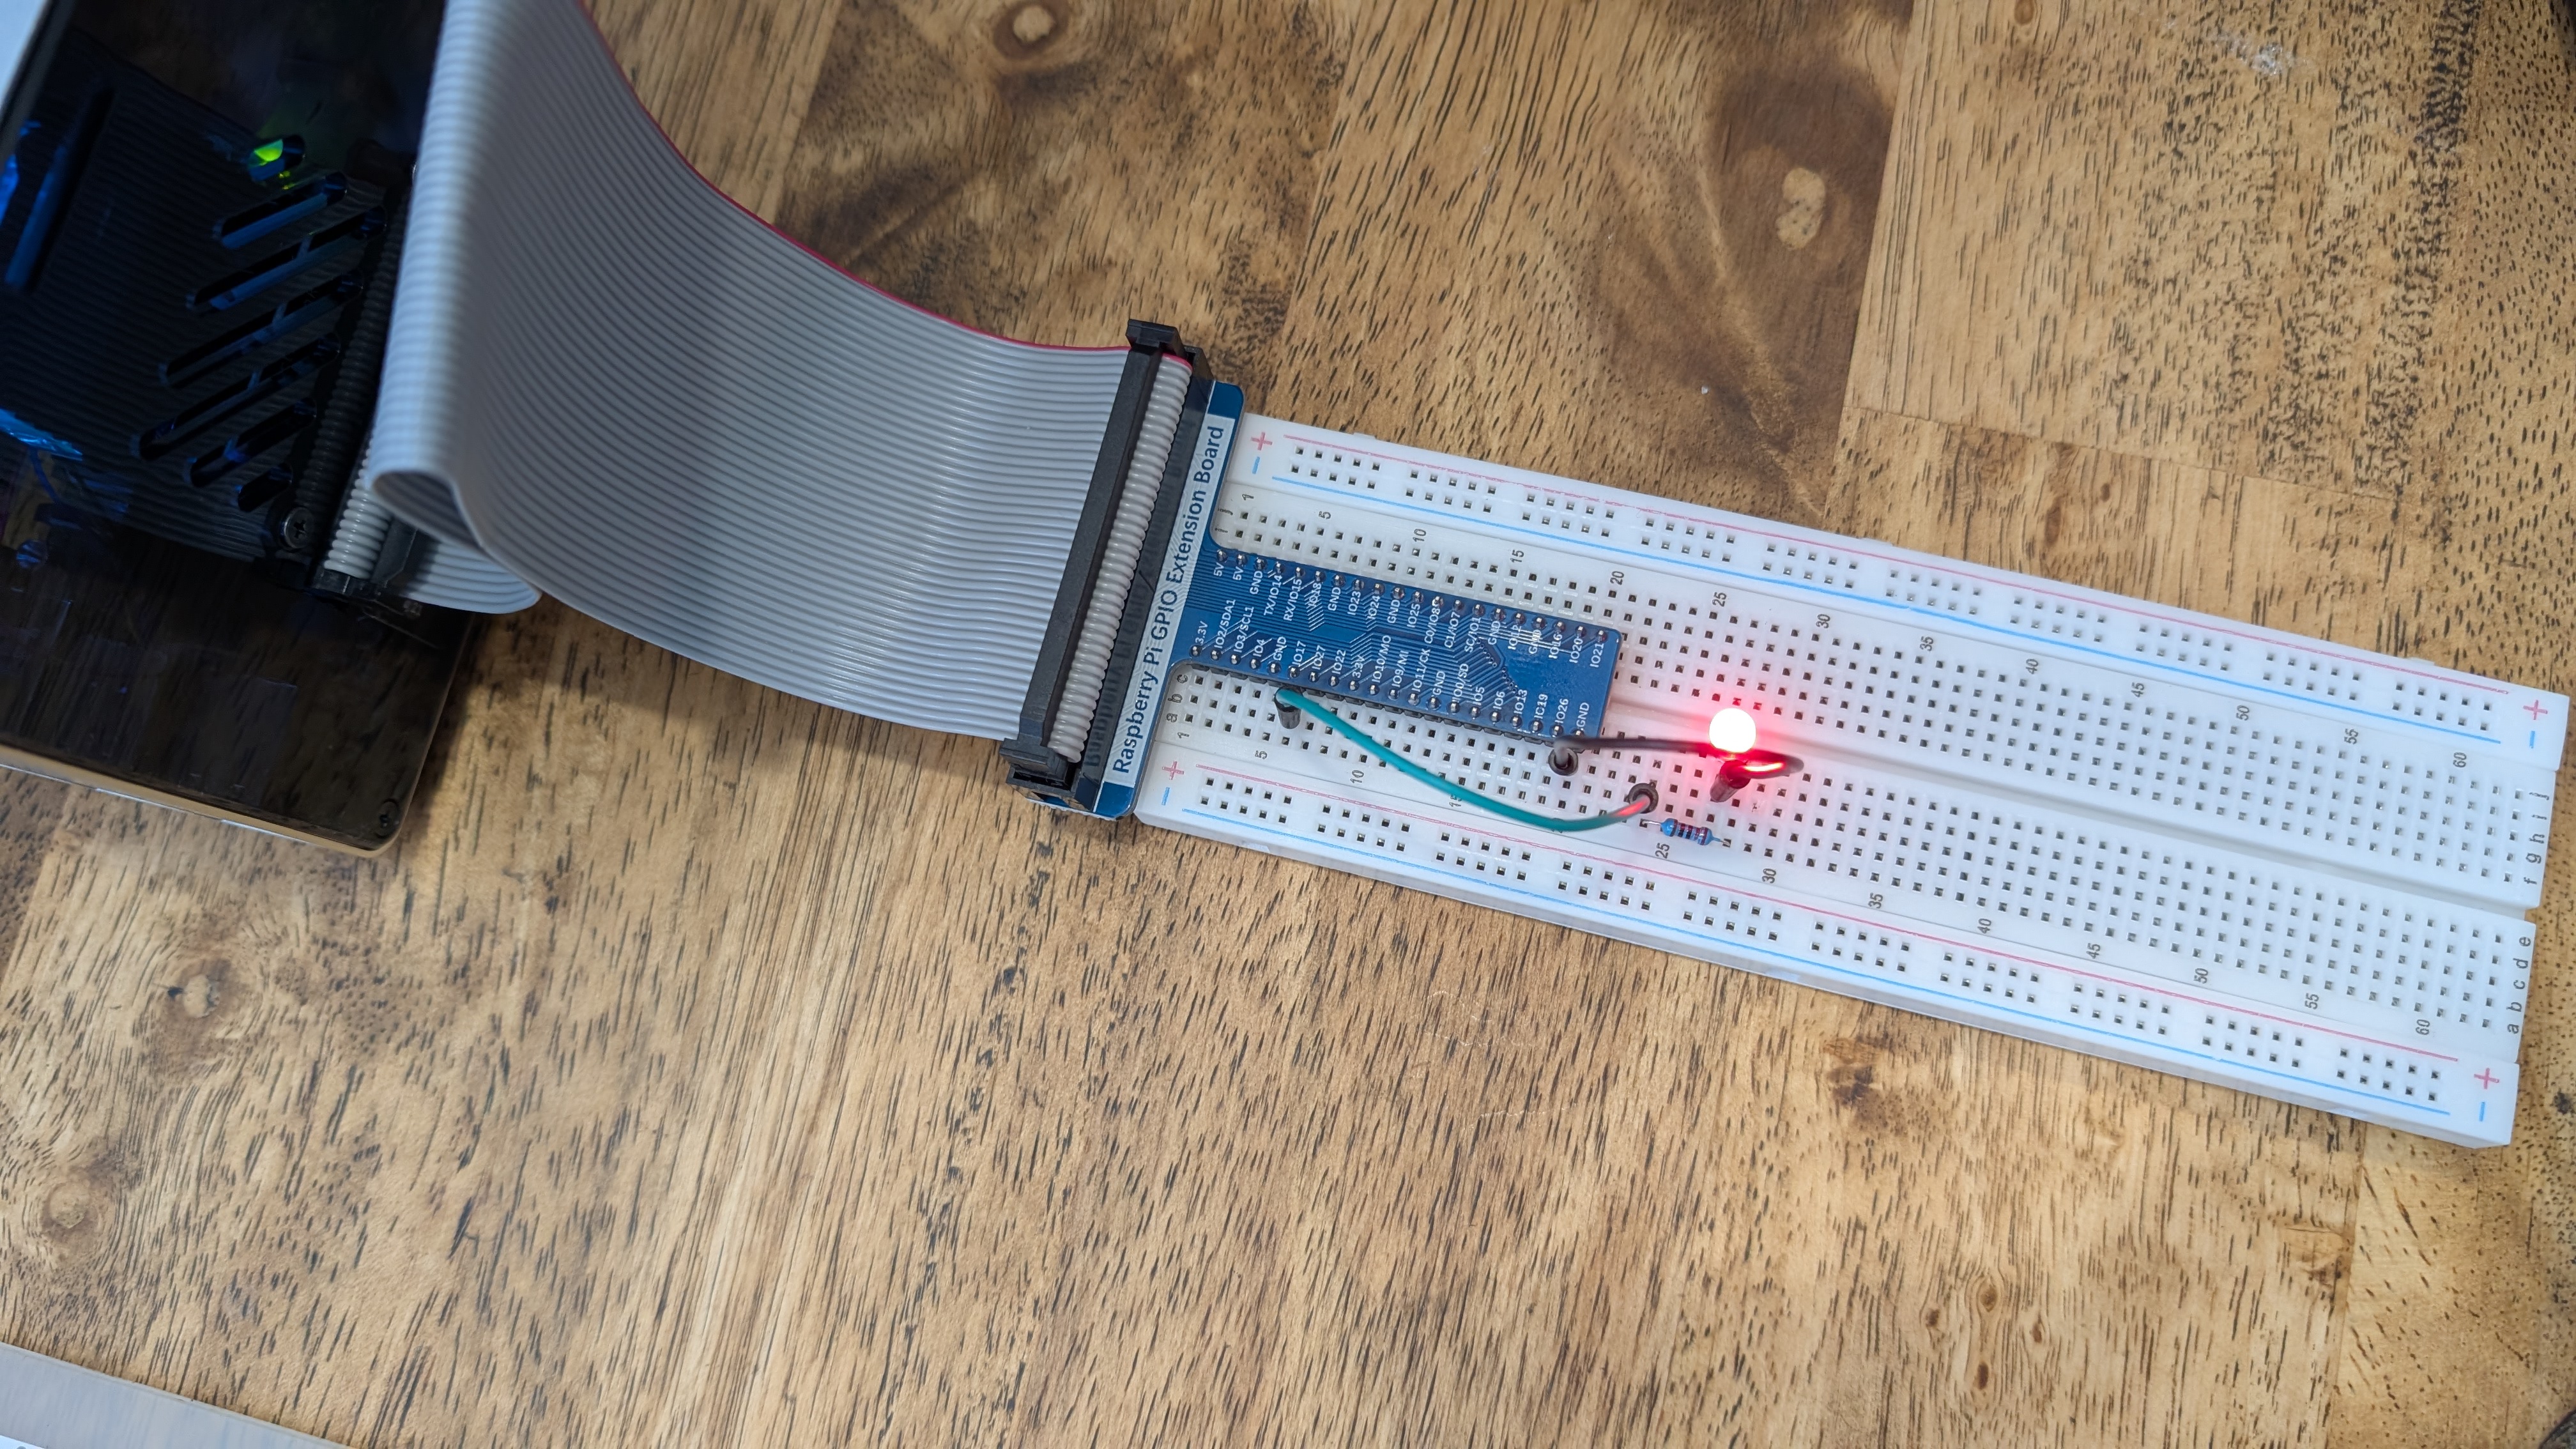
Table of Contents
Overview
This article will cover electronics projects and embedded programming for Raspberry Pi using the Freenove ultimate starter kit for Raspberry Pi. As this is the first installment, we will try controlling an LED (blinking) with Rust.
Target Audience Level
I am completely new to Rust for embedded systems and circuit design, so I will proceed at that level. I knew about breadboards but didn’t know how to use them, and I learned through LED blinking. So, if you understand the basic syntax of Rust and are unfamiliar with other aspects, you should be able to learn the process of LED blinking from a similar standpoint. However, since Raspberry Pi uses a Linux-based OS (such as Raspberry Pi OS (64bit)) and has limitations in processing speed and capacity, it is desirable to be familiar with SSH connections, CLI operations, and English. Even if you are not accustomed to CLI or English, CLI is text-based, so you can get support by copying and pasting information into a generative AI to generate commands or explain what you are doing in natural language.
What to Use
- Raspberry Pi 3~5 (with GPIO)
- Freenove ultimate starter kit for Raspberry Pi
- This kit includes a breadboard, resistors, LEDs, etc.
- Client machine with Rust installed
- Developing and compiling on Raspberry Pi can take a long time, so developing and cross-compiling on another machine may be advantageous in terms of capacity and development efficiency.
How to Use a Breadboard
Please refer to Sunhayato’s documentation for how to use a breadboard.
A breadboard is similar to Excel, with rows and columns composed of numbers and alphabets.
| - | + | a | b | c | d | |
|---|---|---|---|---|---|---|
| 1 | ||||||
| 2 | ||||||
| 3 | ||||||
| 4 |
Row 1 has a1, b1, c1, d1, and these are wired and conductive within the same row. Row 2 is similarly conductive with a2, b2, c2, d2, and all rows are conductive in the same way. The board has holes where you can simply insert pins or component leads to connect them without soldering. Since they are conductive within the same row, you can create circuits by inserting leads across rows. There is a groove in the center of the row, forming a symmetrical structure, but conductivity is interrupted at this groove, so please be careful about that.
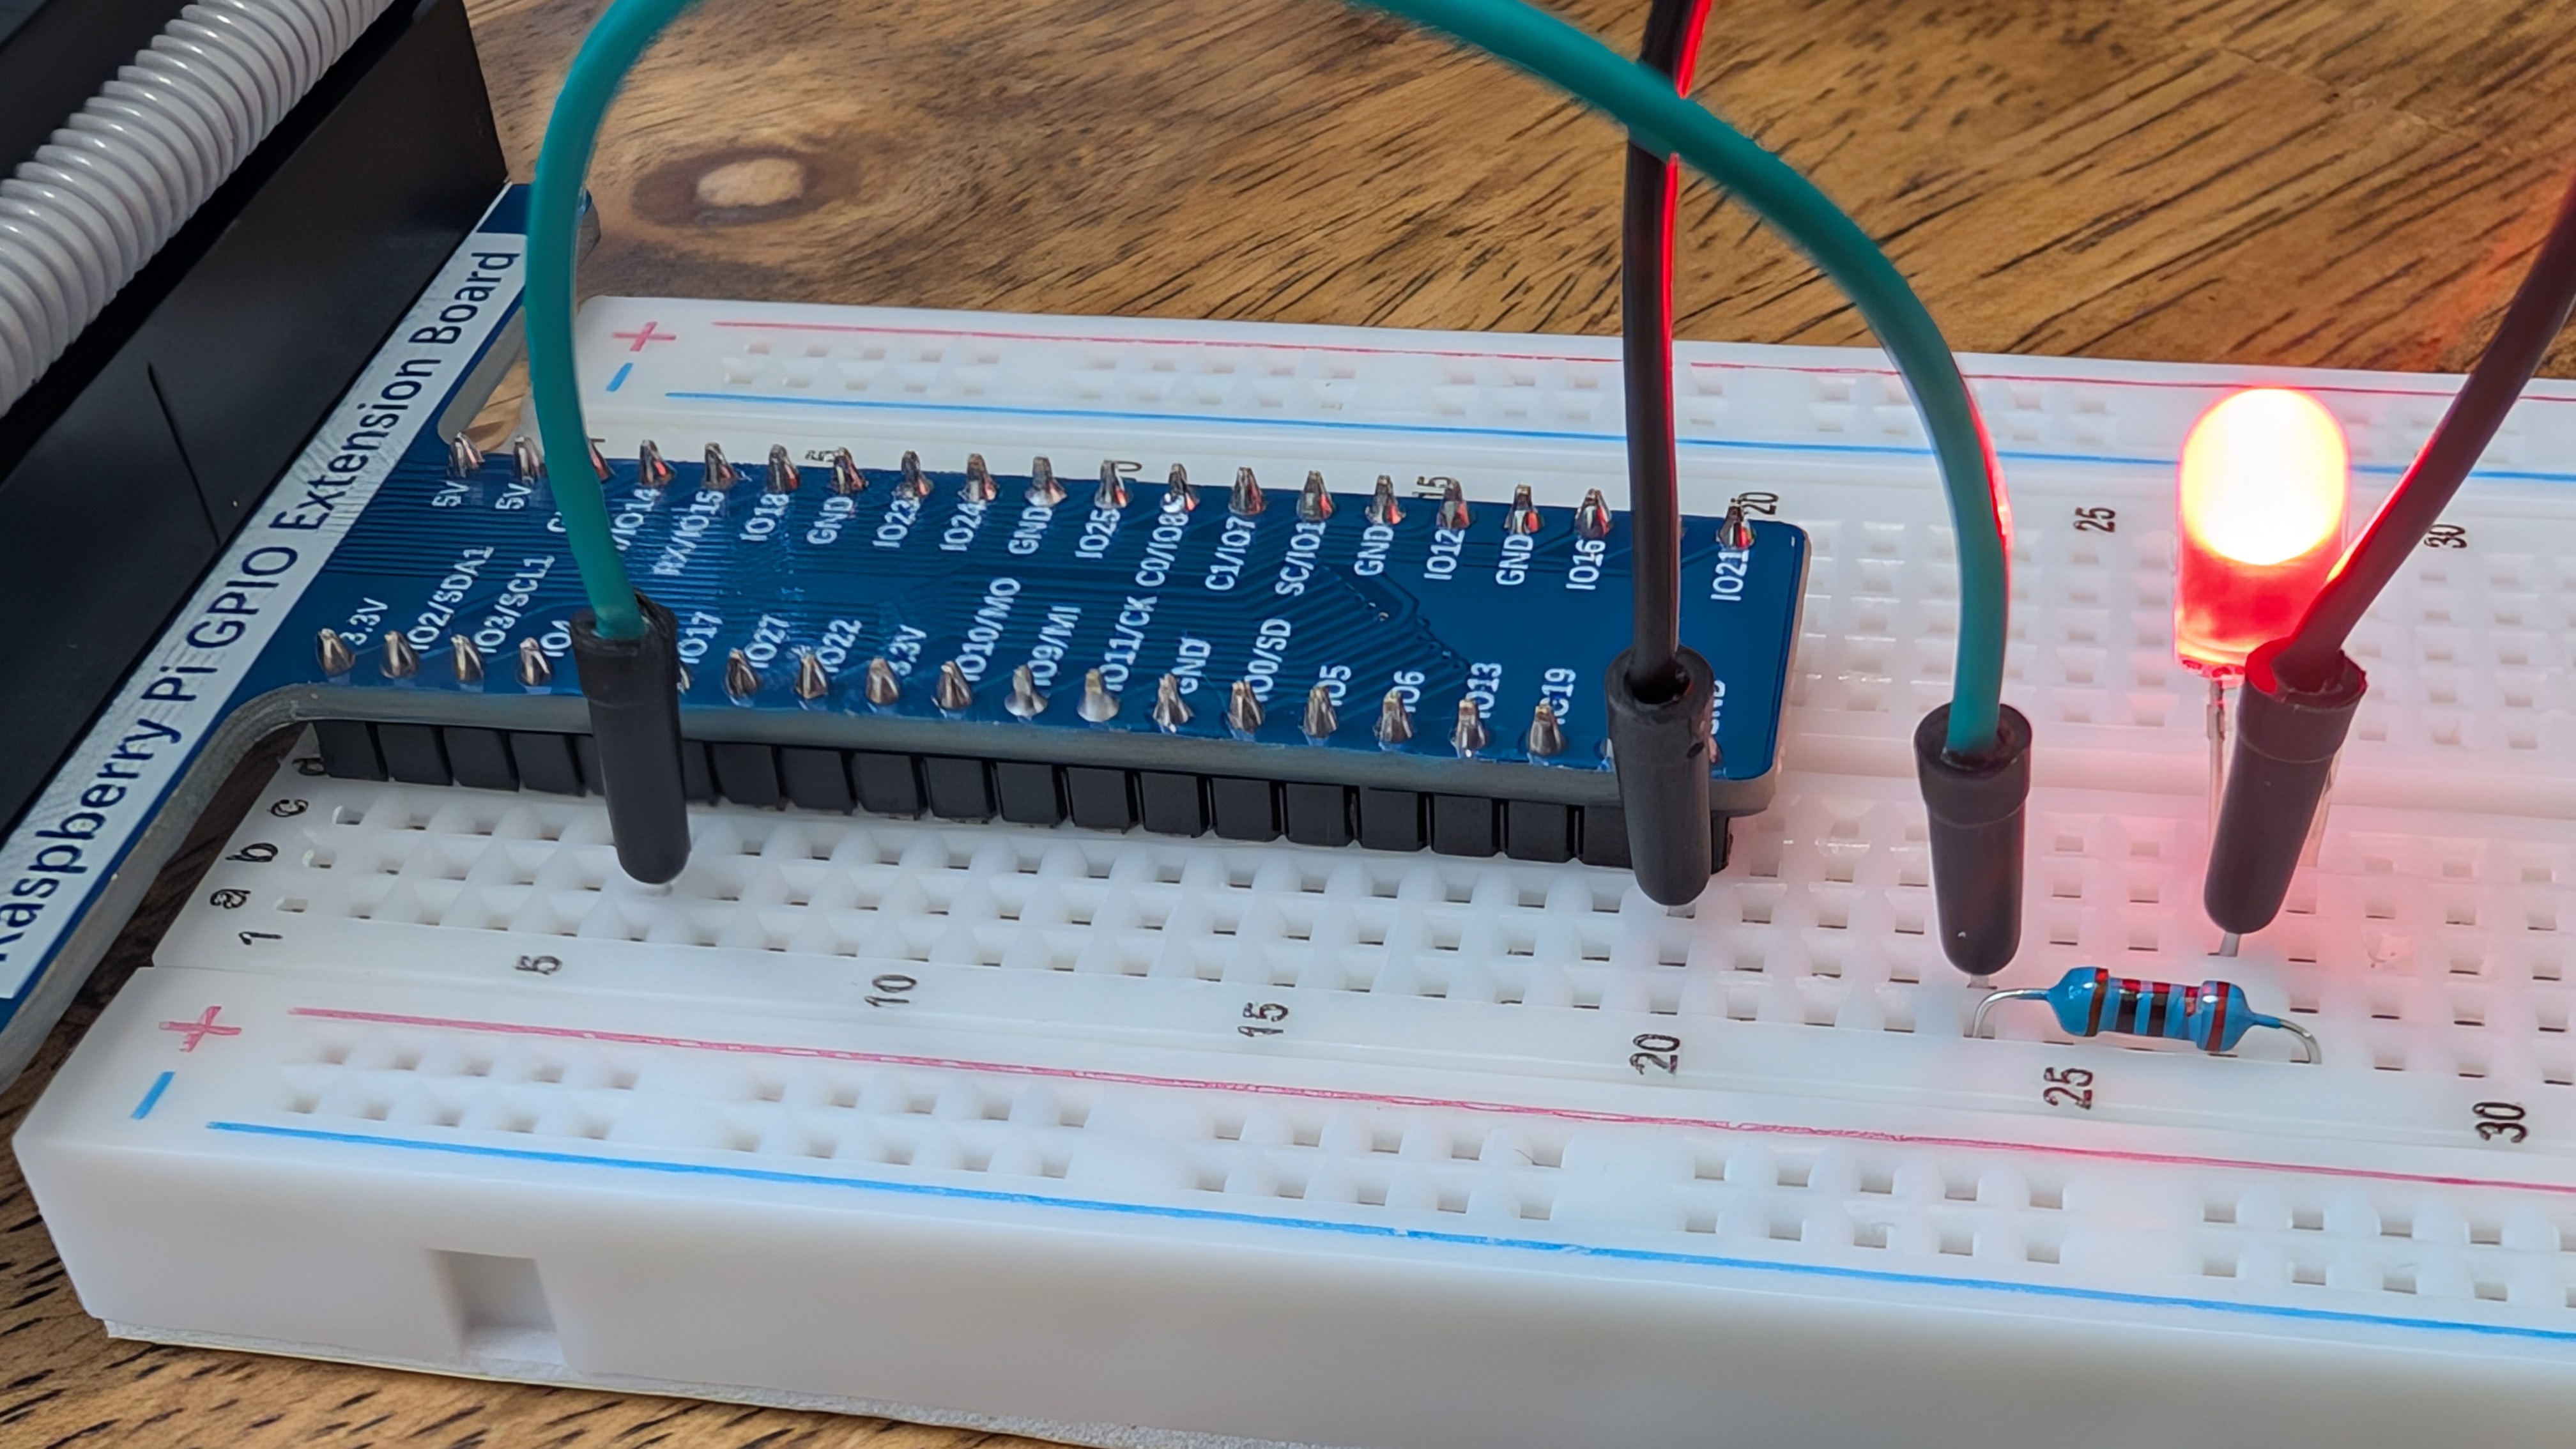
For this LED blinking project, we will create a circuit in four steps: (1) control GPIO pin 17 to supply electricity, (2) adjust the current with a resistor, (3) insert the LED in the correct direction, and (4) connect the LED to GND.
Building the Circuit
As shown in the introductory image, there is a board and cables for connecting the GPIO and breadboard, so please connect the breadboard and GPIO first. If you don’t have them, it’s better to procure them separately, but if you are unfamiliar with electronics, it’s probably better to just buy a kit.
Next, find pin 17 and insert a jumper cable into the same row. Insert another jumper cable into a different row, and in that row, insert a 220Ω resistor. Similarly, insert the other end of the resistor into the breadboard, and in the same row, insert the longer leg of the LED. Insert the shorter leg, avoiding the row used for the resistor or pin 17, and insert a jumper cable into the same row. Connect the other end of the inserted jumper cable to the row with the GND pin, and the circuit is complete. The LED is lit in the photo, but the LED will not light up just by building the circuit.
Writing the Code
Create a project with Cargo and add the crate to write the code.
cargo add rppalThis article uses rppal version 0.22.1. Create .cargo/config.toml in your project and add the following:
[target.aarch64-unknown-linux-gnu]
linker = "/opt/homebrew/bin/aarch64-linux-gnu-gcc"
The linker needs to be installed separately, and the path may vary depending on your OS, so please be careful. For installation methods of aarch64-linux-gnu-gcc for Windows (WSL), Mac, and Linux, please refer to the output from Perplexity.
Next, write the code in src/main.rs within your project.
use rppal::gpio::{Gpio, Level};
use std::error::Error;
use std::thread::sleep;
use std::time::Duration;

const LED_PIN: u8 = 17;

fn main() -> Result<(), Box<dyn Error>> {
    println!("Program is starting...");
    let gpio = Gpio::new()?;

    let mut pin = gpio.get(LED_PIN)?.into_output();

    println!("LED will blink every 1 second.");

    loop {
        pin.write(Level::High);
        println!("LED turned on >>>");
        sleep(Duration::from_secs(1));
        pin.write(Level::Low);
        println!("LED turned off <<<");
        sleep(Duration::from_secs(1));
    }
}
Since pin 17 is used, 17 is set to the LED_PIN constant. Gpio::new()?; initializes and allows access to GPIO functions. Then, by passing the pin number to the get method of the initialized Gpio and getting the return value of into_output(), you receive an object in a format that allows ON/OFF switching. Since the state changes for power ON/OFF in subsequent processing, you need to declare the variable with let mut to make its value mutable.
Finally, an infinite loop is defined, and passing Level::High within pin.write turns the LED on, while Level::Low turns it off. sleep(Duration::from_secs(1)) defines a 1-second sleep, creating a mechanism where the LED turns on and off every second indefinitely.
Compiling and Transferring to Raspberry Pi
Executing cargo build --release --target aarch64-unknown-linux-gnu at the project root will cross-compile for Raspberry Pi (64bit). After compilation, execute ls target/aarch64-unknown-linux-gnu/release/Blink and if the path is returned, compilation is successful.
$ ls target/aarch64-unknown-linux-gnu/release/Blink
target/aarch64-unknown-linux-gnu/release/Blink
Once compilation is successful, transfer the generated executable file to Raspberry Pi. Here’s an example of copying it from macOS to the Raspberry Pi desktop with the name Blink. Assume the Raspberry Pi’s IP address is your_pi_ip_address and the username is pi (please rewrite according to your environment and settings).
From the project root directory in the macOS terminal, execute the following scp command:
scp target/aarch64-unknown-linux-gnu/release/Blink pi@your_pi_ip_address:~/Desktop/BlinkWhen you execute the command, you may be prompted for a password depending on your settings. If so, please enter the password you set.
Executing LED Blinking
After transferring the executable file to Raspberry Pi, connect to Raspberry Pi via SSH and execute it.
ssh pi@your_pi_ip_addressOnce logged in, navigate to the Desktop, which is the file transfer destination.
cd ~/DesktopGrant execution permissions to Blink.
chmod +x BlinkExecute Blink. Root privileges may be required to directly operate GPIO. First, execute ./Blink to check if LED blinking works. If it doesn’t work, try executing it with sudo as shown below.
sudo ./BlinkIf successful, all tasks in this article are complete.
Summary
Although it’s just an LED blinking, it contains important fundamentals such as:
- Creating Raspberry Pi programs with the Rust language
- Controlling GPIO with a program
- Understanding the mechanism and usage of a breadboard
- Understanding how to build circuits
- Actually building circuits
- Verifying the operation of embedded programs and circuits and confirming full functionality
Being able to do these things allows you to learn more complex circuits and controls, and how to handle components, not just from books but also through experience, which increases efficiency. The Freenove ultimate starter kit for Raspberry Pi provides code and documentation for Python, Java, C language, and Scratch, but I will continue to try implementing with Rust and learn about circuits and embedded systems.


Loading comments...