Trying to Write a Mobile App with Tauri 2.0 (RC)
Table of Contents
The release candidate for Tauri 2.0 was announced. Tauri 2.0 adds mobile features, so I’ll try out the functions by creating a counter app for smartphones.
About Tauri 2.0
Tauri 2.0 RC was announced on August 1, 2024, and a stable release is planned for the end of August. Tauri allows you to build desktop apps using TypeScript or WebAssembly, and you can also use Rust for the backend. It is being developed as a migration path from Electron.
In Tauri 2.0, mobile features have been enhanced, enabling the creation of apps for iOS or Android using TypeScript and its frameworks, not just desktop apps. Changes include separation of core plugins, improvements to Rust API, and enhanced security. It can be said that this is a version upgrade that strengthens functionality as a cross-platform development framework.
Since the stable release is scheduled for the end of the month, I’ll try mobile development with Tauri 2.0 a bit early.
Development
I’ll actually build an app with Tauri 2.0.
Version
- rustc 1.80.0 (051478957 2024-07-21)
- node v20.8.0
- Tauri 2.0 RC
Starting Development with Tauri
Follow the official documentation for setup. You can check the documentation at the following link.
https://v2.tauri.app/start/
First, create the project with the following commands. Once the stable version is released, you can remove the --rc option.
cargo install create-tauri-app
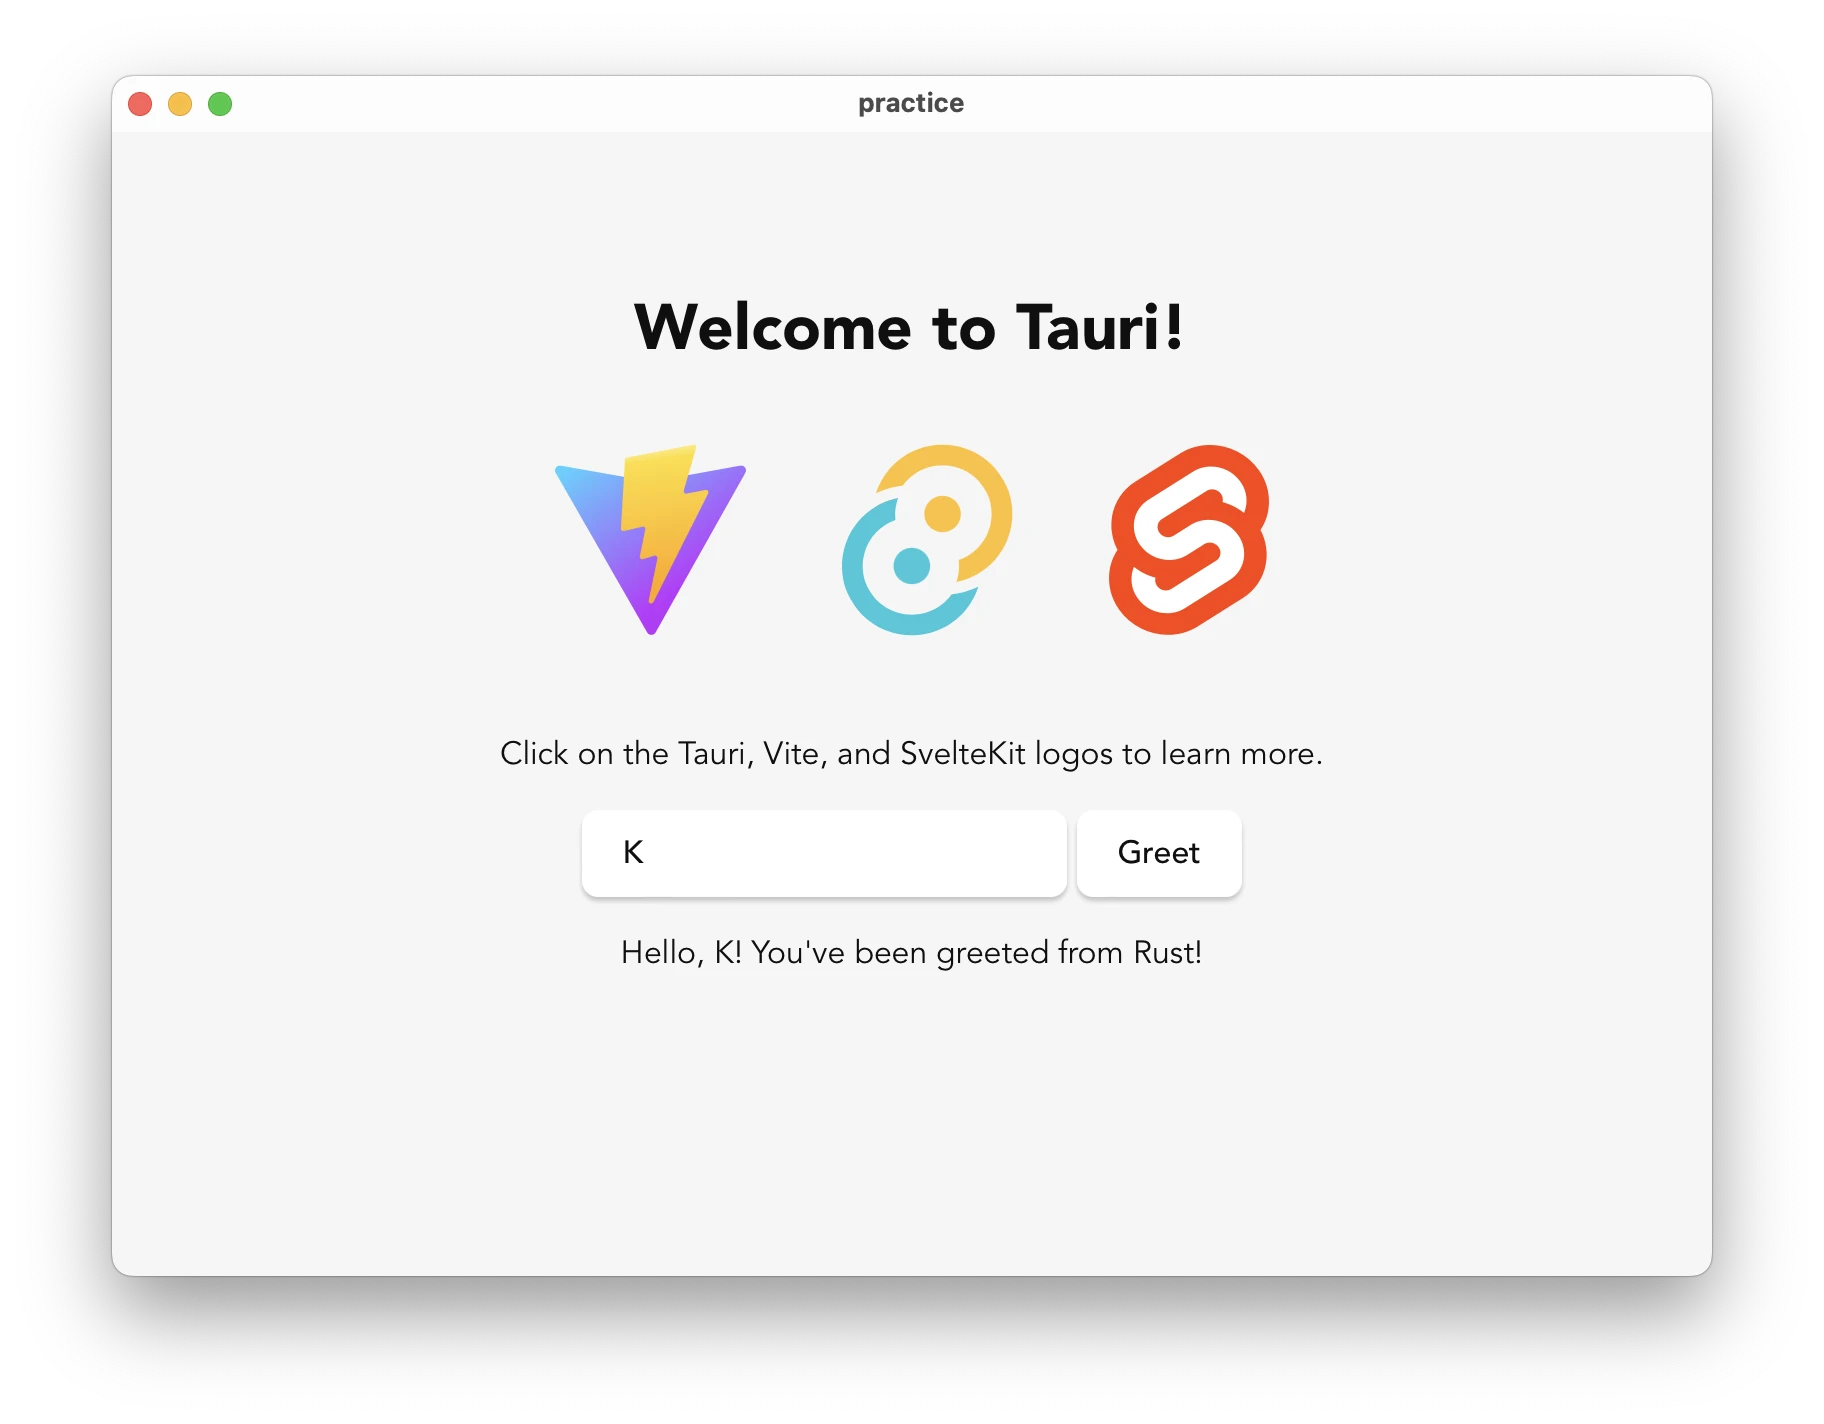
cargo create-tauri-app --rcAn example of input after running create-tauri-app is as follows.
✔ Project name · practice
✔ Choose which language to use for your frontend · TypeScript / JavaScript - (pnpm, yarn, npm, bun)
✔ Choose your package manager · npm
✔ Choose your UI template · Svelte - (https://svelte.dev/)
✔ Choose your UI flavor · TypeScript

Template created! To get started run:
  cd practice
  npm install
  npm run tauri android init
  npm run tauri ios init

For Desktop development, run:
  npm run tauri dev

For Android development, run:
  npm run tauri android dev

For iOS development, run:
  npm run tauri ios dev
The project name can be anything. For the frontend language, you can use JS/TS, Rust, or ”.NET”. Choose your preferred language. For the package manager, select the one you usually use. UI template options are displayed based on the language. I’ll try with Svelte this time, but you can choose your preferred framework.
By selecting options according to the questions, the Tauri project will be created. After the template is created, enter cd {project_name}, move to the template folder, and run npm install. Then, run the npm run tauri dev command to display the web page as a Tauri app. Connect your smartphone to your PC for Android or iOS testing, and also try commands like npm run tauri android dev.
Project Structure
When you move to the project created with Svelte, there are roughly the following folders.
src
src-tauri
static
src is the project composed of Svelte and SvelteKit, where you can edit frontend and backend processing using SvelteKit. src-tauri is used for building backend processing with Rust, invoking system processing via Tauri, and setting app icons or permissions. Think of it as handling settings other than UI and routing construction. static is a folder for placing files used in Svelte.
Creating a Counter App
Next, I’ll create a counter app using Svelte. The structure inside src is as follows.
src
├── app.html
└── routes
    ├── +layout.ts
    └── +page.svelte
app.html is the base HTML that receives output from SvelteKit and displays it. By creating +page.svelte in routes, you can handle routing and page creation. You can easily set up pages and routing by creating a folder in routes and placing +page.svelte inside it. For this simple counter app, I’ll edit +page.svelte.
Removing Unnecessary Code
Open +page.svelte and remove unnecessary code.
<script lang="ts">

</script>

<div class="container">
    <h1>Welcome to Tauri!</h1>

    <div class="row"></div>
</div>

<style>
    :root {
        font-family: Inter, Avenir, Helvetica, Arial, sans-serif;
        font-size: 16px;
        line-height: 24px;
        font-weight: 400;

        color: #0f0f0f;
        background-color: #f6f6f6;

        font-synthesis: none;
        text-rendering: optimizeLegibility;
        -webkit-font-smoothing: antialiased;
        -moz-osx-font-smoothing: grayscale;
        -webkit-text-size-adjust: 100%;
    }

    .container {
        margin: 0;
        padding-top: 10vh;
        display: flex;
        flex-direction: column;
        justify-content: center;
        text-align: center;
    }

    .row {
        display: flex;
        justify-content: center;
    }

    h1 {
        text-align: center;
    }
</style>
The initial code includes import { invoke } from "@tauri-apps/api/core";, which is a library for using Rust features in the frontend. Since we’re just building a simple app, we’ll remove it.
Svelte is composed of three blocks: TypeScript (JavaScript), HTML, and CSS, and processes are reflected on a per-module basis. Unlike React with JSX or TSX, if you can read HTML, CSS, and JavaScript, you’ll understand it to some extent.
Editing app.html to Prevent Zooming
Tauri runs a browser-like environment to turn web framework apps into desktop or mobile apps. As a result, users can zoom like in a browser, which makes it feel more like using a browser than a normal app. For this purpose, zooming is unnecessary, so add the following line to edit app.html.
<meta name="viewport" content="width=device-width, initial-scale=1.0, maximum-scale=1.0, user-scalable=no">The overall result is as follows.
<!doctype html>
<html lang="ja">
  <head>
    <meta charset="utf-8" />
    <link rel="icon" href="%sveltekit.assets%/favicon.png" />
    <meta name="viewport" content="width=device-width, initial-scale=1.0, maximum-scale=1.0, user-scalable=no">
    <title>Tauri + SvelteKit + Typescript App</title>
    %sveltekit.head%
  </head>
  <body data-sveltekit-preload-data="hover">
    <div style="display: contents">%sveltekit.body%</div>
  </body>
</html>
Writing the Counter App
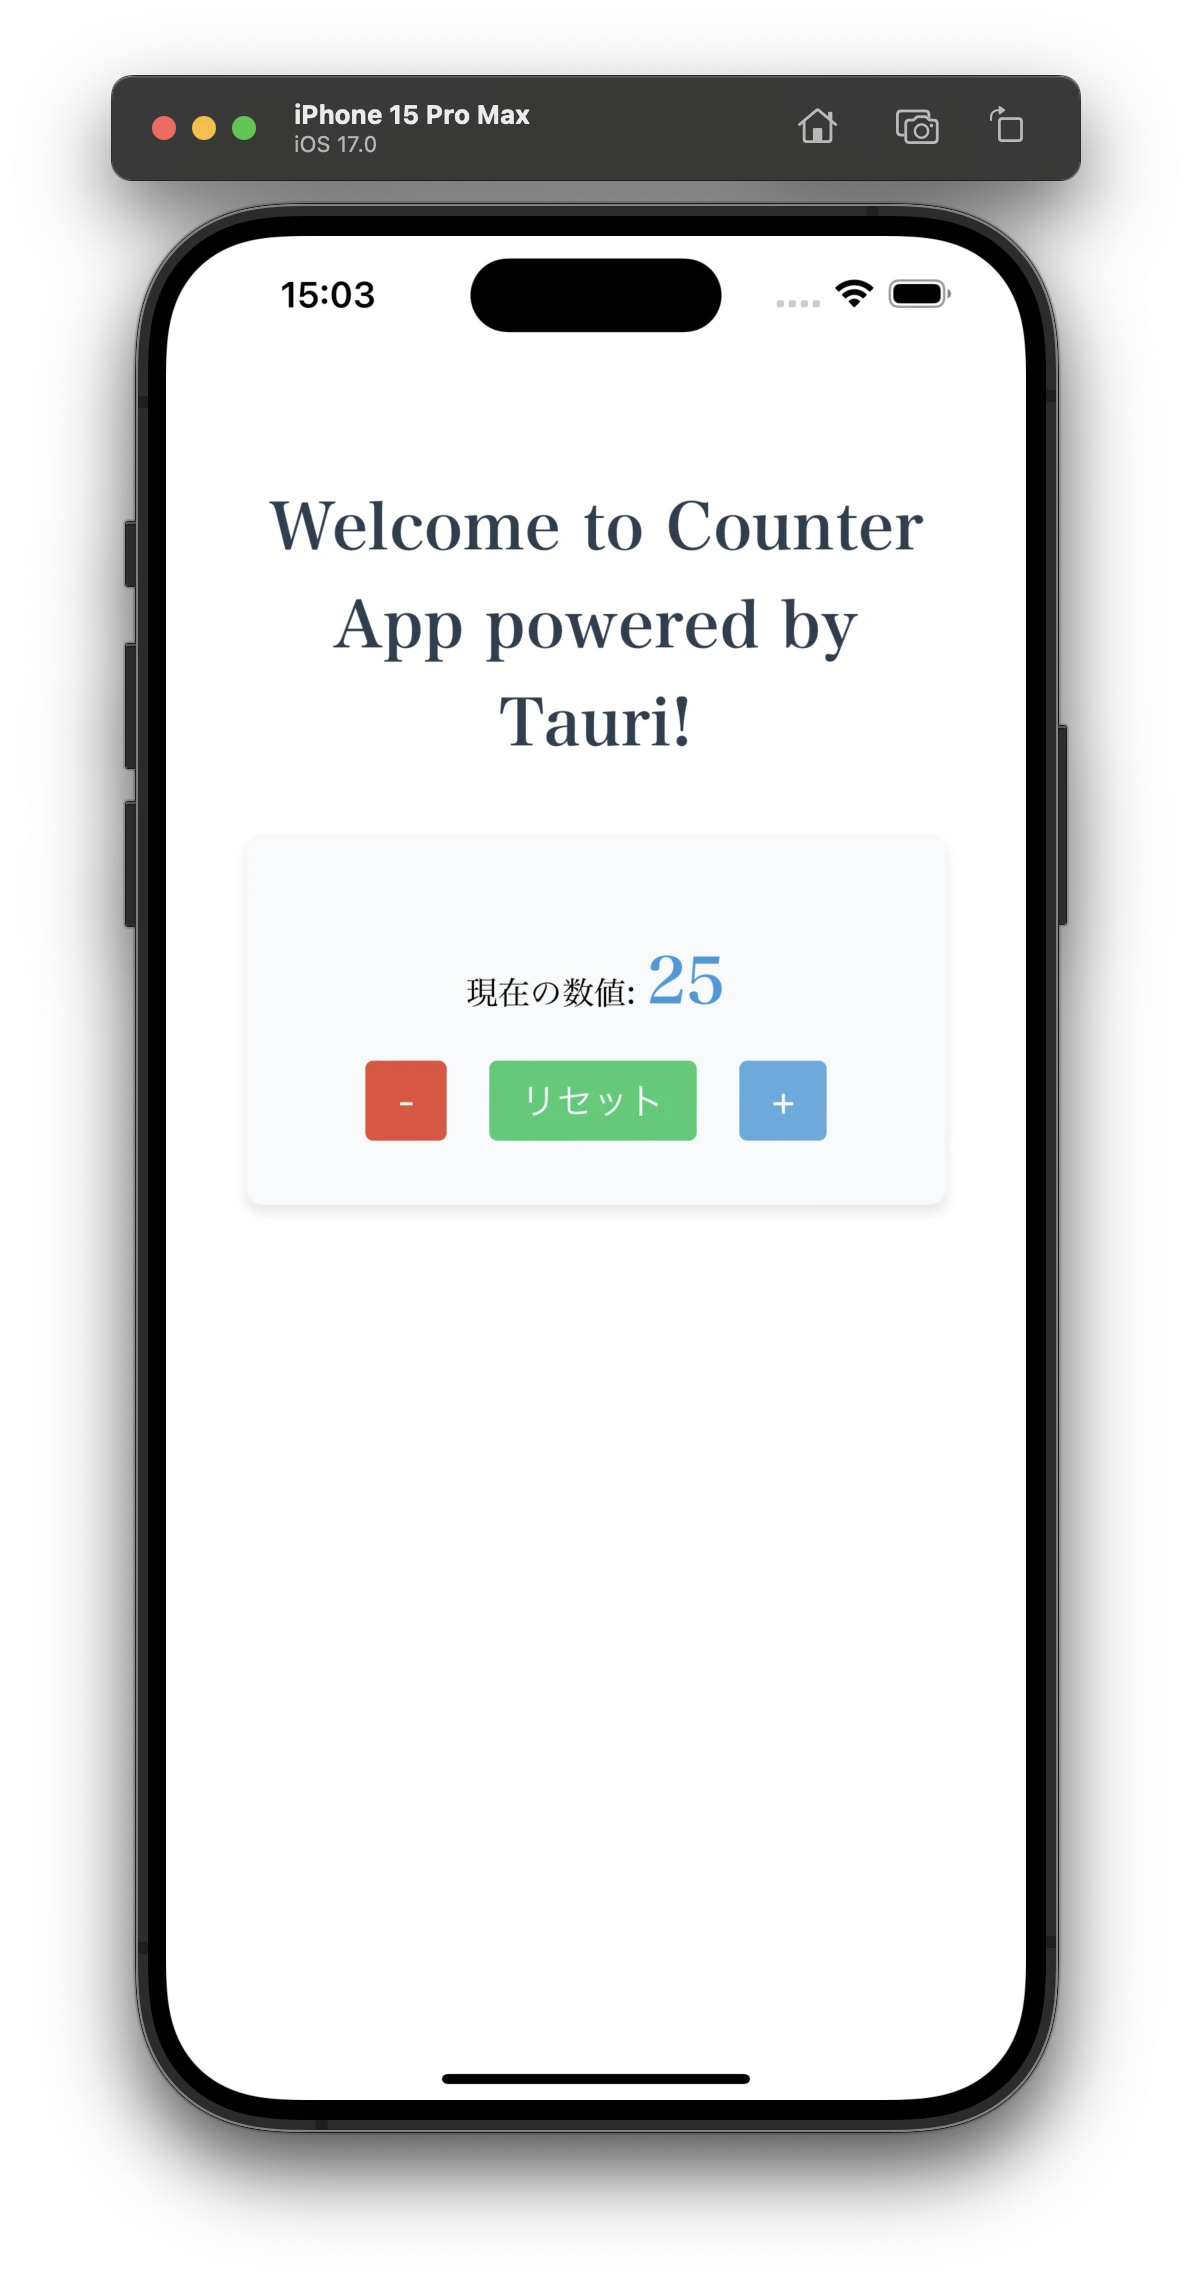
First, write the functionality for the counter app. The counter starts from 0. The buttons will increase by 1 when + is pressed and decrease by 1 when - is pressed, assuming the counter value is 0 or more. There will also be a reset button that sets it back to 0. In TypeScript, this is as follows.
<script lang="ts">
    let count: number = 0;

    function increment(): void {
        count++;
    }

    function decrement(): void {
        if (count > 0) {
            count--;
        }
    }

    function reset(): void {
        count = 0;
    }
</script>
HTML is written as follows to create a simple counter.
<div class="container">
    <h1>Welcome to Counter App powered by Tauri!</h1>

    <div class="counter">
        <p>Current value: <span class="count">{count}</span></p>
        <div class="buttons">
            <button on:click={decrement}>-</button>
            <button on:click={reset} class="reset-button">Reset</button>
            <button on:click={increment}>+</button>
        </div>
    </div>
</div>
You can pass functions by writing the function name inside {} in the on:click attribute. The counter value is embedded by writing the variable name in curly braces.
CSS is written as follows.
<style>
    .container {
        text-align: center;
        padding: 2rem;
    }

    h1 {
        color: #2c3e50;
        margin-bottom: 2rem;
    }

    .counter {
        background-color: #f8f9fa;
        border-radius: 8px;
        padding: 2rem;
        box-shadow: 0 4px 6px rgba(0, 0, 0, 0.1);
    }

    .count {
        font-size: 2rem;
        font-weight: bold;
        color: #3498db;
    }

    .buttons {
        margin-top: 1rem;
    }

    button {
        font-size: 1.2rem;
        margin: 0 0.5rem;
        padding: 0.5rem 1rem;
        border: none;
        border-radius: 4px;
        cursor: pointer;
        transition: background-color 0.3s;
    }

    button:nth-child(1) {
        background-color: #e74c3c;
        color: white;
    }

    button:nth-child(2) {
        background-color: #2ecc71;
        color: white;
    }

    button:nth-child(3) {
        background-color: #3498db;
        color: white;
    }

    button:hover {
        opacity: 0.8;
    }
</style>
You can use regular CSS, or frameworks like Tailwind CSS or PostCSS. Customize the design as you like.
The completed code for +page.svelte is as follows.
<script lang="ts">
    let count: number = 0;

    function increment(): void {
        count++;
    }

    function decrement(): void {
        if (count > 0) {
            count--;
        }
    }

    function reset(): void {
        count = 0;
    }
</script>

<div class="container">
    <h1>Welcome to Counter App powered by Tauri!</h1>

    <div class="counter">
        <p>Current value: <span class="count">{count}</span></p>
        <div class="buttons">
            <button on:click={decrement}>-</button>
            <button on:click={reset} class="reset-button">Reset</button>
            <button on:click={increment}>+</button>
        </div>
    </div>
</div>

<style>
    .container {
        text-align: center;
        padding: 2rem;
    }

    h1 {
        color: #2c3e50;
        margin-bottom: 2rem;
    }

    .counter {
        background-color: #f8f9fa;
        border-radius: 8px;
        padding: 2rem;
        box-shadow: 0 4px 6px rgba(0, 0, 0, 0.1);
    }

    .count {
        font-size: 2rem;
        font-weight: bold;
        color: #3498db;
    }

    .buttons {
        margin-top: 1rem;
    }

    button {
        font-size: 1.2rem;
        margin: 0 0.5rem;
        padding: 0.5rem 1rem;
        border: none;
        border-radius: 4px;
        cursor: pointer;
        transition: background-color 0.3s;
    }

    button:nth-child(1) {
        background-color: #e74c3c;
        color: white;
    }

    button:nth-child(2) {
        background-color: #2ecc71;
        color: white;
    }

    button:nth-child(3) {
        background-color: #3498db;
        color: white;
    }

    button:hover {
        opacity: 0.8;
    }
</style>
For iOS execution, first run npm run tauri ios init to prepare the app, then npm run tauri ios dev for emulator or real device testing. For Android, replace “ios” with “android”. The execution result is as follows.
Build
After the app is complete, you can build it with npm run tauri android build or npm run tauri ios build. Building allows installation or distribution on real devices.
Comparison of Svelte Behavior with Beta Version
Regarding Svelte, unlike the Beta version, it now supports not only SPA but also routing with SvelteKit, making it easier for Svelte developers to use. Compared to Flutter or React Native, Tauri is still immature with a smaller community, so future development is expected.
Summary
I created a mobile app with Tauri 2.0 (RC). If you have knowledge of web technologies like TypeScript, you can build the GUI and create mobile apps based on that. For motivated developers, you can also combine backend processing with Rust to make more complex and stable apps. Although it’s still in development as an alternative to Electron, future updates are anticipated.


![[Rust] Controlling LED Brightness with a Potentiometer](https://b.rmc-8.com/img/2025/12/09/619fcb6df86be6be77c4b698b825a332.jpg)
![[Rust] Blinking an LED with a Raspberry Pi Learning Kit](https://b.rmc-8.com/img/2025/06/01/1fbe657aa246865432be2e1d53002531.jpg)
Loading comments...